Ever wondered how you can airbrush a landscape in minutes? Most airbrush art uses very thin layers of paint and you cannot move it around like you do regular paint with a brush. But what if there were a style of airbrush painting that used thick enough layers of paint on a non absorbent surface that allowed you to move the paint around and create incredible landscapes, textures and effects in minutes!
The wonderful thing about airbrush painting in this way is that it opens up possibilities that are between the world of airbrush artists and the world of traditional painters. When you work with a regular brush, you are often not aware of the what you can do with a delicate spray of paint or simply how you can blow the paint around with the air from your brush. Let’s travel to the far off world of airbrush art and learn some new airbrushing tips, tricks and techniques!
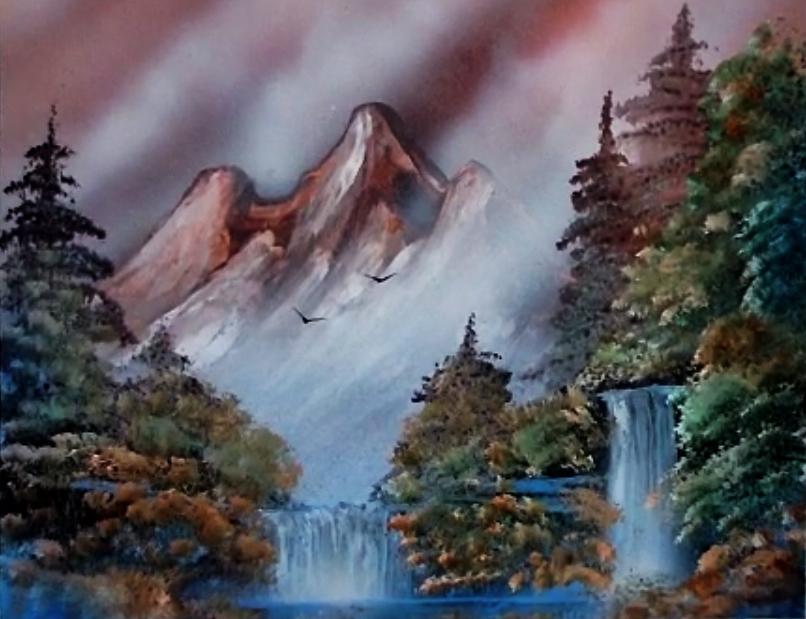
 So how were these mountains made with an airbrush you might ask?! Well, I’ll tell you. Here are some great tips to whet your appetite for some real airbrush classes. You see, when you can airbrush layers of paint onto your paper, then you can drag them around using a simple household material, newspaper! These techniques come from the world of Mexican spray paint art, but they have been adapted for airbrush with water based acrylic paint by Alisa and Gerardo Amor. Most traditional painters never consider using newspaper and magazine paper as a brush.
Notice the sky in this next painting. Those effects were created by simply blowing the paint around with the air from the airbrush itself! Now that I know how many cool effects you can create by using the air from the brush as a tool, I can never go back. There are so many things you can do by blowing your paint around in different ways. It’s well worth experimenting with.

Most airbrush artists make clouds by simply spraying on a fine mist of paint to create a misty shape. That certainly is one great way of going about it but there are other ways.
Here are some new airbrushing tips to explore:
If your paper is very wet, you can apply wet paint to it with your brush and then use the air itself to move all the wet paint around to create a very natural swirly kind of cloudy sky. You can also apply paint with pieces of newspaper, dragged across a wet canvas to create wonderful streaks of color that can then be blown around with the air to make them look even more natural. Galaxies can be created in this way too! These are exclusive tips and techniques on airbrush like you’ve never seen them before!

Here are some simple clouds, done in the traditional manner, just airbrushed on using the torn edge of a piece of poster board as a quick stencil. Learning how to paint all these paintings in well under 20 minutes each is one of the many benefits of learning how to airbrush like a spray paint artist!
Oh, I didn’t mention that?! Yes, these airbrushing tips all come from the fascinating world of Mexican spray paint art. They have been adapted to work with an airbrush instead of a spray can.
Unconventional airbrush classes from Mexican spray paint artists!
If you enjoy airbrushing, then you have probably airbrushed a waterfall at some point, but adding a bit of spray paint art technique to your waterfall can make them even more solid and real looking. The effects were created by layering the paint on with the airbrush and then using a sheet of newspaper to drag the colors down into the shape of the waterfall.
By the way, the foliage was done using spray paint art techniques using sponges and newspaper. It’s way quicker than doing it with a fan brush! You can cover a lot more space, so it’s good to know how to work this way, especially if you want to do murals later!
One cool thing you can do is add clouds on top of anything when you have an airbrush. You don’t need to wait till it dries like with regular acrylic painting! It sure is good to have an airbrush around and some cool techniques.

With the right classes and tutorials, you can also paint all kinds of incredible things including sea scape. Check out the foam in this ocean scene! How long do you think it took to create? If you said 5 minutes, you’d be right . It was made by again, blowing the paint around with the air from the brush.
Want to learn how to do that?
Check out this video to get some more tips about painting seascapes with airbrush art!
I hope you have gotten some good ideas and enjoyed learning about how to airbrush landscape paintings in new and fun ways!


